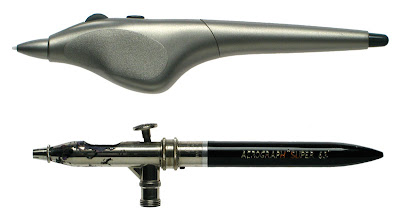
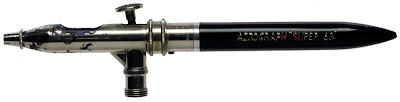
Top: A Wacom Intuos 3 Airbrush Stylus.
Bottom: a 1984 Devilbiss Aerograph Super 63 airbrush.
Images are to scale. Click on image to see a bigger version.
Through an unexpected series of events I find myself the proud owner of a Wacom Intuos 3 airbrush. This baroque device has fascinated me ever since I saw its ancestor in the catalogue that came with my first Intuos 1 tablet back in 1999; but between the additional cost (at £100-110, about £40 more than a standard stylus in the UK) and complete lack of information on what the thing actually
did, I never seriously considered buying one. Now I've been lucky enough to receive one as a gift, I thought I'd take the chance to show what it is and what it does, so that anyone thinking of paying for one can make an informed decision.
(So you can know whether to trust my opinions, here's where I'm coming from: I'm a professional comic artist and colourist and for about eight years I've been drawing and "painting" using a Wacom tablet. These days I use Intuos 3 gear on a Mac, Adobe Illustrator CS3, Adobe Photoshop CS3 and Corel Painter X. I my teens and early 20's I was seriously into airbrush art, and though I was no Phillip Castle, I was fairly proficient; I used a double-action independent DeVilbiss Aerograph Super 63a for general work, a double-action fixed Conopois F for large area coverage, and a right-handed Paasche AB turbo for fine work.)Description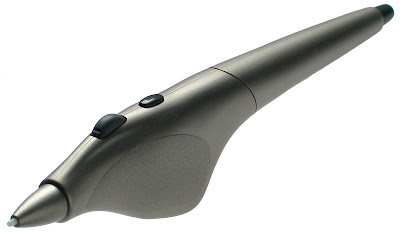 A 3/4 view of the Wacom Intuos 3 airbrush, showing the standard stylus tip, the control wheel and button on top, and eraser tip on the end.
My particular model is a Wacom Intuos 3 airbrush, compatible with all Intuos 3 and Cintiq tablets. Intuos 1 and 2 tablets have their own airbrushes; Graphire tablets are not supported.
The airbrush is a specially-shaped Wacom Intuos stylus with the usual 1024 level-sensitivity mechanism and standard stylus tip, plus eraser on the rear end. You draw by pressing it to the tablet like a normal stylus; it's not held above the surface like a real airbrush.
As with other Wacom 3 styli, the airbrush comes with 3 replacement standard tips, a textured tip and a spring-loaded stroke pen tip. The tips are standard-sized, so the airbrush can use the replacement tips supplied in the WACZP300E Wacom Intuos3 Pen Customisation Kit.
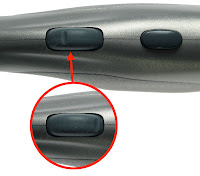
Instead of the rocker switch that falls under the index finger on a standard stylus, the airbrush has a wheel that rotates approximately 90º (there's a notch on the wheel to show the position of rotation) plus a single button that is set by default to imitate right-click (or ctrl-click on a Mac) for calling up menus.
Top view of the Wacom airbrush showing the control wheel (with notch to show degree of rotation) and programmable button.As with other Wacom stylae, this button can be reprogrammed in the Wacom driver control panel, though there are no options for the wheel (unlike the wheel on a Wacom mouse).
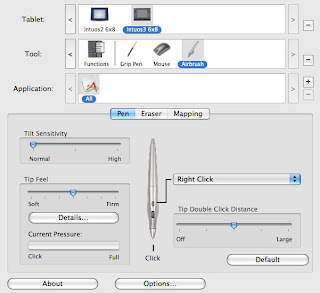 Options for the Wacom airbrush in Wacom preferences; note that the wheel is not activated from here, but from within the brush controls of individual applications.
So why go to all this trouble? After all, both Photoshop and Painter have no shortage of airbrush-style brushes, and a standard pressure-sensitive stylus lets you control the size or opacity of said brushes. To explain, I'll need to quickly talk about what a real airbrush does.
Comparing the Wacom airbrush with a real airbrush
 A DeVilbiss Aerograph artist's airbrush. In the hands of a skilled operator it can produce everything from a broad spray to a pencil-thin line.
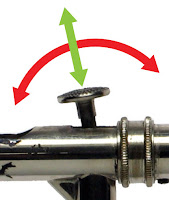
The Wacom airbrush stylus is designed to imitate imitate the action of a
double-action independent or artist's airbrush. These airbrushes were invented in the 1890's and have been in common use by designers and graphic artists since the 1930's. The airbrush is controlled by a single lever which has both a pressure and a pivot action; pressing down on the control lever increases the flow of air through the mechanism, pulling back increases the flow of paint.
The control lever of a double-action independent airbrush; vertical pressure on the lever controls air flow, horizontal pressure controls paint supply.This arrangement allows the airbrush to produce anything from a hairline of colour through to a wide spray for covering large areas - provided the operator has sufficient skills. Airbrushes are fiddly beasts, and learning the fine muscular control needed to operate one is the work of years.
It's important to understand this - it means that if the Wacom airbrush successfully imitates a real airbrush, it will take skill to use and time to master.The point is, with an artist's airbrush, you can control two factors at once and in any combination; airflow and paint flow. With a graphics tablet and a standard pressure-sensitive stylus you can really only control one factor at once. So if you have, say, a Photoshop brush where the tip pressure changes the brush size, then you can't control opacity; set the opacity to change through pressure and the width remains fixed. Set both opacity and size to increase through pressure and you can't have a dense fine line or a faint broad one. With the additional control (the wheel) on the Wacom airbrush, you can alter size and opacity independent of one another - giving very much the same sort of control as the real airbrush.
Grip and operation
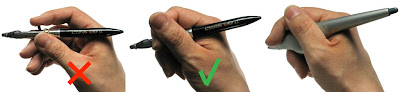
Left: It's natural to hold an airbrush like this, but it makes control difficult and puts strain on the hand.
Centre: Gripping the airbrush inside the fist with the lever trapped under the second joint of the index finger is much more effective (the so-called "aerographer's grip").
Right: The Wacom airbrush can be held and operated in more or less the same way.
There's a right and a wrong way to hold a real airbrush. The intuitive thing to do is hold the airbrush between thumb and middle finger with the index finger outstretched to press and pull on the control lever. In fact, generations of airbrush artists have found that far better control (with much less strain on the fingers) is gained through the so called "aerographer's grip."
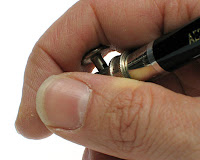
The "aerographer's grip" opened up a little so you can see the control lever nestling against the second joint of the index finger.The airbrush is wrapped right inside the fist with the control lever nestling inside the second joint of the index finger. It looks odd (and feels very strange at first), but after a little practice the full range of press-and-pull on the control lever can be acheived by flexing the fist around the lever. Since the control lever of a real airbrush is spring loaded, returning to the "off" position when released, it takes a certain amount of effort to hold the lever in position, and that's far easier and less strenuous to do using this unlikely-looking grip.
When, years ago, I first saw a Wacom airbrush in a catalogue, my first thought was that it would be impossible to hold it using the aerographer's grip, but in fact the molded shape encourages the hand into roughly the right position. The index finger can lie across the control wheel, pulling it back and forth with a slight flexing of the muscles. It's a slightly different grip from that used with a real airbrush, but close enough.The wheel has a slight resistance that feels startlingly like the resistance from the lever on a real airbrush. Unlike the lever, the wheel does not automatically return to the "off" position; once adjusted, you can release your grip and the setting will be retained until you change it. I did find this a bit confusing at first; my airbrushing reflexes told me to keep pulling against the wheel, so it was always drifting up to the maximum setting. After a couple of hours I got past that, though, and though I'm pretty rusty, my control is improving. The wheel allows for very fine control, but, as with a real airbrush, it requires skill to operate and patience to learn.
Software
 Left: Corel Painter's Airbrush brushes.
Right: The Wacom airbrush.There's a possible source of confusion coming up, because in this next section I'm going to be talking about both Corel Painter's Airbrush brushes and the Wacom airbrush. To clarify, in this article "Airbrush brush(es)" or just "brush(es)" are always
software, part of the toolkit of a graphics application like Corel Painter or Adobe Photoshop. "Wacom airbrush" always refers to
hardware, the piece of kit you hold in your hand and draw with (see illustration above).
With the Wacom airbrush, the hardware is only part of the story; each graphics application also needs to be compatible in order for it work properly. What little I could find about the Wacom airbrush online led me to believe that it might only work with Corel Painter, and though this is not true, the Wacom airbrush doesn't really work straight out of the box with
any application. When I first tried it with Photoshop, it just acted like an ordinary stylus; the wheel was ignored. Even in Painter, most of the Airbrush brushes didn’t respond; after a while I realised I needed to look for brushes marked "Wheel Airbrush," though with these
only the wheel worked; the stylus tip was ignored.
After a bit of despondency, it occurred to me to call up Painter's Brush Creator and to see if any of the brush settings could be set to respond to the wheel. Sure enough, most control categories have a drop-down list that lets you set variation according to a number of factors including "pressure," "direction" and, yes... "wheel."
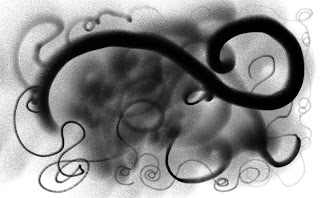 Left: testing my home-made Airbrush brush in Painter. Stylus pressure controls size, and the wheel controls opacity. The brush also responds to the tilt and direction of the stylus, and "paint" will "pool" if the tip is left over one point for too long. Because of the way the brush is generated, drawing a fine line really quickly causes it to break down into a chain of soft-edged dots.
(Click on image to see a bigger version).
The degree of response to the wheel can also be altered using a slider (so turning the wheel can make a big difference or a small one). With some fiddling, I made myself an Airbrush brush that did what I wanted; pressing on the tip changed brush size and the wheel changed opacity. It did take me a while to realize that, unlike every other brush I'd ever used, Painter's Airbrush brushes get narrower the
more pressure you apply (like getting a finer line with an airbrush by moving it towards the paper), but once I'd got that sussed - bingo!
 (Click on image to see a larger version)
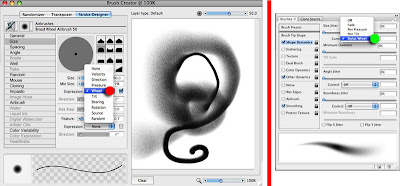
Left: Painter's Brush Creator. Many functions have an option called "Expression". Click on this to get a drop-down menu (marked with red dot). Picking "Wheel" from the menu lets you control that function with the Wacom airbrush wheel; picking "Pressure" means that function will be controlled by pressing on the stylus tip.
Right: Photoshop's brush controls. Many functions have an option called "Control." Click on this to get a drop-down menu (marked with green dot). Picking "Stylus Wheel" from the menu lets you control that function with the Wacom airbrush wheel; picking "Pen Pressure" means that function will be controlled by pressing on the stylus tip.Once I knew what to look for, I was away. Delving into Photoshop's brush controls I found similar wheel settings, and I made matching brushes. Even Adobe Illustrator has wheel controls for some of its brush types, though as Illustrator brushes don't have variable opacity, said controls are not terribly useful for my purposes.
So, after that, what was it like to use? "A bit fiddly," is the answer, though in very much the same way as my real airbrushes were, and at least the Wacom can't clog up! I used to be quite good with an airbrush, but it's twenty years since I used one on a regular basis (and more than ten since I last even picked one up). With practice using the Wacom airbrush is becoming more and more intuitive; with only a few days regular use I'm already much more fluent with it.
In summary: The Wacom airbrush will definitely work with the following applications:
- Adobe Photoshop
- Corel Painter
- Adobe Illustrator (limited use)
EDIT: Thanks to Vitor for this link to
this table at wacom.com that lists a load of different software and which Wacom features and tools (including airbrush) they support.
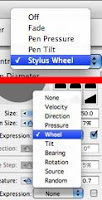
If you still need to check if your software (or software version) will support the Wacom airbrush, go into your brush controls and see if you can find options for "wheel" or "stylus wheel".
Left: If your graphics application has an option like this within the brush controls it's probably compatible with a Wacom airbrush.It's annoying that, with the exception of a few brushes in Painter, graphics applications do not come with preset brushes that will work with the Wacom airbrush straight out of the box. You have to set up such brushes yourself, and thought it's not difficult, there's no advice in the application help menus on how to do this.
But here's where it gets interesting.
Thinking Outside The Box
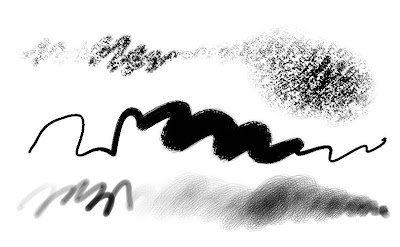 Painter Chalk and Acrylic Brush variants where brush size is controlled by the wheel and opacity by stylus pressure.
At the beginning, I was careful to describe the Wacom airbrush as a stylus with an extra control; thinking of it as an electronic airbrush is a useful metaphor, but also limiting.
Here's what I mean:
For a living I draw and colour comics. I do the colouring in Photoshop and Painter. I hardly ever use the airbrush tools in Photoshop and Painter, because there are way too many people out there already producing bland, soft-edged faux-80's airbrush art on the computer already.
Yet I use my Wacom airbrush all day, every working day.
Once you think of the Wacom airbrush as just another stylus with an extra control, a whole world of possibilities opens up; the "(Stylus) Wheel" setting on the brush controls in Painter and Photoshop can be applied to all sorts of settings and all sorts of brushes. Most of the time I use my Wacom airbrush with hard-edged painting brushes or textured crayon brushes; pressure on the stylus controls opacity, so I can shade, the wheel controls size, so I can get into little fiddly corners and then go straight to filling in big areas without needing to change brushes; in fact, it's like using the flat of the crayon for colouring in and the edge for drawing fine lines, or being able to just squodge the tip of a large paintbrush down into a small space.
This doesn't sound like much, but the improvement in productivity has been amazing. These kind of brushes are also much easier to control than the Airbrush brushes.
At the moment I'm just using the wheel to control size or opacity, but you can also set it to change the colour of a brush, or add or remove texture... the possibilities are intriguing.
Conclusion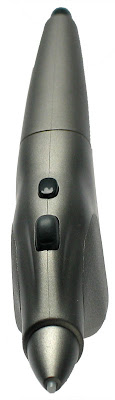
Before I tried a Wacom airbrush, I viewed it as an expensive and amusing oddity - but now I've tried one, I understand it's a serious tool with a range of uses beyond simply imitating an airbrush. Its great value is as a time-saving tool for professionals, and in giving additional control for experienced users. If you're an airbrush artist switching to a graphics tablet, I'd seriously consider one. If you're an experienced tablet user, it's worth considering as an additional tool. But because it requires skill to control and a certain amount of software wrangling, it's definitely not for beginners.
A word to Wacom here; you've got an excellent product, but you're really shooting yourself in the foot as far as marketing and implementation goes. Show the thing off! There should be much more information about the Wacom airbrush on your website (how's about some nice QuickTime movies showing the object itself, the controls and what you can do with it?). Plus, there needs to be more information about software setup for Painter and Photoshop - in fact, you should have pre-configured Wacom airbrush brushes available as free downloads for Wacom airbrush owners.
Finally, think about dropping the airbrush paradigm (or launching an additional product) - Wacom users who know they don't need an airbrush might very well see the use of a "Wacom stylus with extra control wheel." For most of my work, it would be easier to have something shaped more like a standard stylus, perhaps with a wheel that fell under the thumb.
I own this first Wacom airbrush only because I received it as a gift; but I've already come to regard it as a necessity, and the next time I have to upgrade my graphics tablet, I'll be budgeting for a new airbrush as well.
'Nuff said.
 The enigmatic Crispy
 Chairman Dil


