 I was recently contacted by a chap called Ewen MacLaughlin who was writing the Wikipedia entry for the Sheffield Students Union Rag Magazine, The Twikker (which turns out to be the oldest rag mag in the UK; for more information, have a gander at the entry itself).
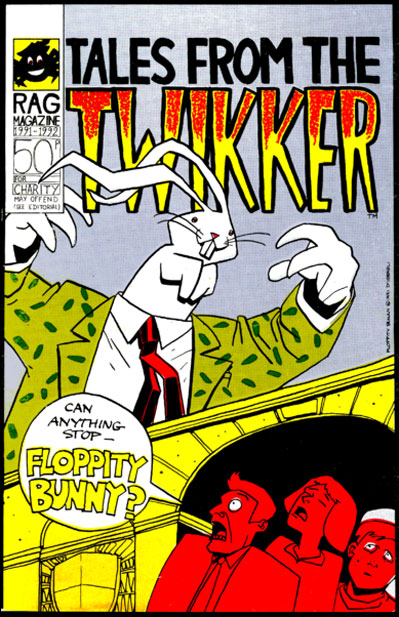
In 1991, I was invited to provide the cover for The Twikker; something I relished, as it's an old Sheffield institution. Time was tight (I had to bash the cover off between episodes of Timulo and Lazarus Churchyard) so it's not my greatest piece of work, but I'm proud of it as the one occasion I really got to use the knowledge of printing they dinned into me at college.
They'd decided to go all out for a four-colour cover, but the problem with full colour printing (especially in pre-digital days) was the separations - the process of turning a piece of full-colour artwork into four printing plates - which was prohibitively expensive. I managed to create my own separations by drawing the cover in black & white and then making three overlays on tracing paper, one for each of the colours magenta, cyan and yellow. Where you needed a solid colour (like the yellow on the bridge), I'd colour in solid black. Where you needed a tint (like the pale blue of the sky), I'd stick down patches of Letratone dot screen.*
This meant that, when I'd finished, I had a black & white drawing covered by three sheets of paper with black and grey splodges on them, along with the fair hope that when these were assembled by the printer, they'd come out looking like the little hand-coloured rough I'd done to show the Student's Union guys what they should be getting.
And, half to my surprise, it did.
*for you Americans, pretty much the same stuff as Zip-a-tone.

4 comments:
Small town America here. My mother being an artist herself, I grew up with letratone and 'Ben Day dots'. It was when reading comics I ran into the mysterious phrase zip-a-tone. Neither my mum nor anyone else knew what it meant, but it certainly sounded magical...
Nowadays I encounter the same kind of bafflement when I go into an art supply store and ask if they can order some letratone. (I quite naturally assume no-one has any in stock anymore, and most of the time I'm right, although every once in a while someone dusts off a single sheet of brittle, yellowing plastic with the gum turned into earwax.) Eventually all communication breaks down and I start demanding "The plastic transfer sheets with the tiny dots," only to be exasperated when the staffer replies, "Oh, that stuff the manga kids use!" and extracts a sheet of letra roughly the size of a fat post-it note.
At which point I shoot the cashier and leave.
Sorry D'Israeli, bit off topic, how did you manage to get your wee drawing in the title of your blog? I can't fgure it out!
Dave
Navan - my understanding is that Zip-a-tone was the same stuff as Letratone but made by a different manufacturer (and who came first I don't know). I'm pretty sure my mate Shane Oakley (artist on Albion) had some actual Zip-a-tone brand dot screen back in the late eighties - it was the same as Letratone but the plastic base sheet was thicker, IIRR.
The artist Daniel Clowes (who used Zip-a-tone extensively in the early issues of his comic Eightball) actually published a half-page elegy to the product when the company went under in the mid 1990's, stating that he's no longer use dot-tone as he considered competing brands to be so inferior!
David - here's how I did it, and there may be a simpler way, I'm a bit of newbie myself.
I used the Firefox browser (which has more sophisticated built-in blogging tools that other browsers), and I opened the "Edit Template" window for Blogger in one tab, and a "New Post" window in another. This let me copy information in one tab, and paste it quickly into another.
In the new post I loaded the JPEG I wanted to use. I used the loading options to get about the right size and to set centring. I switched from "compose" to "HTML" view and copied the block of HTML text relating to the JPEG.
The next bit varies according to whether you're using old Blogger or new Blogger Beta.
In Old Blogger, copy all the formatting information (the whole paragraph of text), switch to the Edit Template tab, and scroll down through the HTML until you find the
text for your title. Paste the HTML for the JPEG into the title text (this can be a bit hit and miss - it took me about three goes to get it in the right place - it's waaay down in the text)
In Blogger Beta, under "Settings," click "Basic" and paste your HTML code into the "Description" box (Under "Title"). You have to alter the code a little though - Beta doesn't accept the HTML formatting tags allowed in the posts.
The HTML for my image looks like this, except for this post I had to replace the pointy HTML brackets ">" with ordinary ones, otherwise Blogger tried to read the code instead of displaying it as text:
(center)(img src="http://photos1.blogger.com/blogger/7605/3142/1600/matt-tharg.0.jpg" height="160"/)(/center)
Hopefully it should still give you an idea.
Ewen here: Thanks for the blog. You didn't tell us how much you'd had to work to get it right! You just kinda got on with it, you star. The 4-colour thing was a restriction from the printers and we loved the way you subverted it with your work. 'They might tell you that they can't do it but they can.' you told me 'They just won't want to...' I still use your tip about labelling inked work with light blue pencil.
Post a Comment